Ah, this is where the rubber meets the road - or, to be precise, where the wrench meets the nut. Once you've learned to drive, this is where you come to pull the last couple of seconds out of your Viper.
|
Tip: New drivers often believe they can cure every ill in the garage. They're wrong. Staying on the track and out of the garage is the quickest way to go fast. |
The Garage menu is excessible from the track screen. The menu has four tabs: Chassis, Align, Aero and Drivetrain. There are two additional buttons in the lower-right screen area - File and Test. Clicking on the File button pops a new window where you may choose to load an existing (previously saved) car setup, Save your current setup, or load the Default setup for the current track.
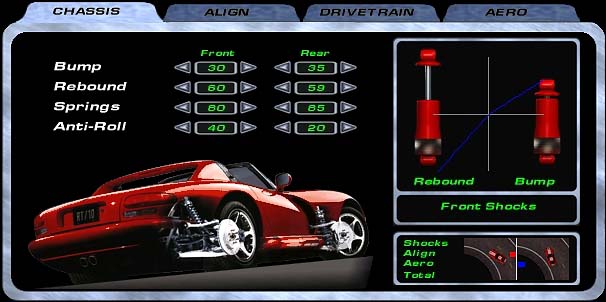
From the Chassis menu you may adjust your Viper's chassis. There are four adjustable settings on this screen: Bump, Rebound, Springs and Anti-Roll. When motionless, the Viper's weight is semi-equally divided between the four wheels, or "corners". There's slightly more weight over the front wheels, but the amount of disparity is constant. That all changes once you start the engine and roll out onto the track. The amount of weight on each corner shifts constantly as the car traverses the course. When you brake, the weight shifts to the front; when you accelerate, the weight shifts to the rear. When you blast through a left-hand sweeper, the weight shifts to the right side of the car, and when your engaged in a combination of these, the weight travels accordingly. For example, a Viper braking as it enters a left-hand hairpin will transfer most of it's weight to the right front wheel.
Chassis adjustments try to equalize this dynamic inequality. Too much - or, for that matter, too little - weight on a wheel can cause it to slide, and that's bad news.
|
Note: The following data is conveniently summarized at the right of the screen (see pic above). The shocks - one compressed and one open - represent bump and rebound. The "ideal" curve should transcribe a 45-degree angle through the rebound section of the X/Y axis and flatten somewhat through the bump portion. Below the Bump/Rebound display is a depiction of the effect each change has on the car. There are four bars from top to bottom, Shocks, Align, Aero and Total. On either side of the small split screen is a Viper. The car on the left side of the split screen is oversteering. When a change draws the bar to the left side of the line, the bar turns red, indicating that the change will tend to make the car oversteer. Conversely, The car on the right side of the split screen is understeering. When a change draws the bar to the right side of the line, the bar turns blue, indicating that the change will tend to make the car understeer. Note that, although your alteration might change that category's input to the cars handling, it may not change the total handling from oversteer to understeer (or vise versa). |
Bump:
"Bump" is the shock absorbers resistance to compression. The higher the bump setting, the less likely the effected end of the car will bottom out (after a jump, for instance), and the more likely it will be to lose traction. For example, setting your front bump settings higher decreases your chance of smacking the car's nose into the pavement after a jump, but increases the car's tendency to push.
Rebound:
Rebound is how quickly a compressed shock will extend. Higher rebound settings stiffen the car's suspension and reduce traction. Low settings make the car "wallow" because it's to slow to reset after each spring/shock compression.
Springs:
The springs control the overall stiffness of a car's corner. The higher the spring rate, the stiffer the corner - and the greater the share of the chassis' overall weight the corner bears. As with the other settings here, a simple rule applies - the stiffer the corner, the less traction it will have.
Anti-Roll:
The anti-roll bar is a quick way to "stiffen" your Viper's suspension. There's a bar at both front and rear of your car. Stiffening the bar (increasing the number) increases the amount of weight transfer to that end of the car and makes it feel a bit more "skittish". Softening the anti-roll bar, on the other hand, adds some grip at the effected end.
If your car pushes (understeers), you may soften the front anti-roll bar or stiffen the rear. If your car is oversteering, you may soften the rear anti-roll bar or stiffen the front.
The Manual | Align | Drivetrain | Aero | Jim's Setup Tips